Sunday, November 27, 2011

Simple Holiday Nail Art Ideas feat. Butter London Holiday 2011

I was a bit naughty this week. I made an order online because I wanted a GWP. I initially justified it by buying a Christmas present for family, then I discovered the butter London Holiday 2011 polishes. Oh dear. I ended up buying two of the three and drawing these designs on my nails when I was swatching:


So I thought I'd share with you these two simple nail art ideas for the holidays! On the left we have Christmas trees and on the right snowflakes. These are using the two gorgeous glitters from the 2011 holiday collection:


On the left we have The Black Knight and on the right Tart With A Heart.


The Black Knight is a black base glitter polish (but needs 3 coats to get opaque otherwise it's a bit of a dark grey). It has magenta and blue glitter with micro silver flecks. So pretty. You could layer this over black to avoid the nastiness of trying to remove a glitter polish.


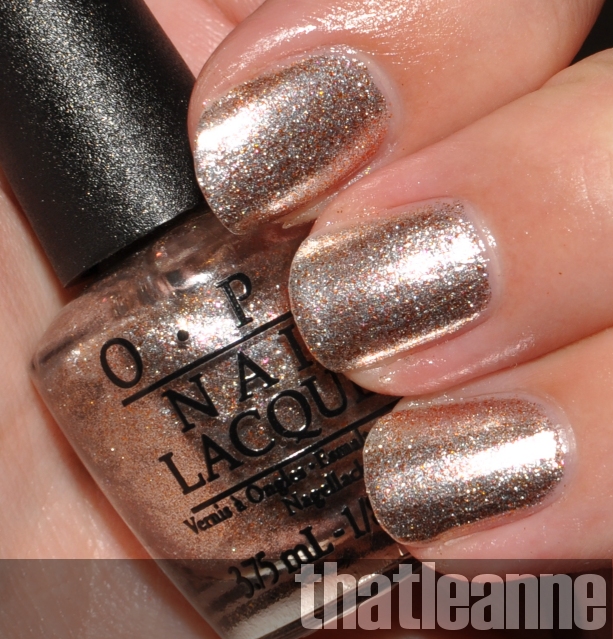
Tart With A Heart has a rosey champagne base colour with gold and slightly holographic glitter (larger particles than in Black Knight). Three coats are shown above but this is clearly meant for layering. So that is what I did for the Christmas trees:


I layered about two coats of Tart With A Heart over another of my button London polishes (from Nordstrom whilst overseas actually, not this week!) called Knees Up. Knees Up is a beautiful red that is very opaque (1-2 coats max).


So to start with I drew a little star with OPI Alpine Snow at the top of each nail with my usual nail art brush.


Then I drew the outline of the tree (messily as it's going to be filled) with the same brush. I did it in sections working my way down the nail.


Then I filled in with white. I originally planned to leave the design there (to keep it simple) but I wanted to add a bit more colour.


I drew another smaller tree inside the white with Essie Pretty Edgy to give it some colour.


Then added some brown for the tree base (Sephora by OPI, cannot recall the colour as it's not written on the mini!) and Sally Hansen Yellow Kitty for the star.


For the snowflakes I must apologise, I did not take progress shots (I didn't think I would post it!) but I did draw on a piece of paper how I was going to paint them:


Basically you start with a vertical line (1), then draw a wide X over it (2). Next the centre of the snowflake needs to have little half diamonds between each two lines (3). To finish, simply add two sets of short lines on each line (4). Done!


I thought I'd share my purchases this week! The L'Occitane gift set was ordered so I could get the Clarins GWP (the white bauble) which also came in red with white spots. I wanted that one :-( Then I went shopping after I got my package and picked up some herbal tea from T2. I plan to go back next week and pick up more presents from there, such an awesome shop. I also got a purple tin for the loose tea.


... and while I was in Portmans I spotted this on the $20 off rack. I saw it and had to have it. It was purple, I couldn't help myself. Now I need to stop spending and save!

Anyways I hope you enjoyed the post and are having a lovely weekend. See you next time!


Sunday, November 20, 2011

OPI Muppets - the glitters! And Kermit take two ;-)

I decided to do a simpler take of last week's Kermit the frog nails after I was done swatching the glitters and I came up with this:


Which was of course based on the Muppets mini box!


I am still looking for a good Kermit green :-/ This time I used OPI Who The Shrek Are You? I need something a little greener! Anyways, onto the swatches!


The Muppets collection has 6 glitters. Left right we have Gone Gonzo! Fresh Frog of Bel Air, Gettin' Miss Piggy With It, Rainbow Connection, Excuise Moi! and Divine Swine.


All the flash swatches are at three coats so you can see how sheer they are - the glitters (with the exception of Excuse Moi!) are all clear polishes with glitter. Above we have Divine Swine.


Above we have Divine Swine again, no flash and a couple more coats to get a good coverage. This polish has small magenta coloured glitter with big silver glitter particles (hexagon shaped, not round).


Above is another swatch of Excuse Moi! I know I swatched the mini version last weekend but I love this polish so much I had to show it twice! This is the flash shot with two coats. The formula is great - no running, opaque at two coats. Love. If you buy anything from this collection (and you like glitters) it would have to be this one. The others have nothing on this polish.


Non flash shot of Excuse Moi! This goes on the favourites list.


Above we have three coats of Fresh Frog of Bel Air. It is a little sheer and the yellowness is possibly the green from the glitter running into the clear base coat. Similar to Divine Swine this has small green glitter with larger silver glitter particles.


Non flash shot of Fresh Frog of Bel Air with a couple more coats (approx 5 for all). Looks better now but these glitters are only practical for layering unless you are patient enough to apply all 5 coats and then remove them at a later date!


Above is a flash swatch of Gettin' Miss Piggy With It. Three coats but this polish is actually a little different in that while there are bigger silver chucks of glitter with the smaller red glitter, there's also big red chunks of glitter. This is the only polish of the 5 sheer clear base glitters that has bigger glitter in another colour.


Non flash shot of Gettin' Miss Piggy With It and more coats.


Above is a three coat flash swatch of Gone Gonzo! A blue clear based glitter polish with bigger silver chunks.


More coats and a non flash swatch of Gone Gonzo!


Lastly we have three coats of Rainbow Connection. This consists of small rainbow glitter particles with two bigger hexagon shaped glitter particles - rainbow and silver I should say. Lots of orange but I don't notice any red glitter.


More coats and no flash of Rainbow Connection.

Well that is it for now! I hope you enjoyed the swatches are having a fabulous weekend! I was going to do gardening but it's been raining all morning. Boo. Better do some chores then ;-) Until next time my lovelies...

Saturday, November 12, 2011

OPI Muppets Mini Nail Lacquers and Kermit the frog nail art!

Hey everyone! I've finally had a chance to sit down and do some swatching! The Muppets polishes have been out for a while now and I picked up the mini set (as well as the 6 glitters, I couldn't resist). Today I want to show you the mini set:


Left to right we have Wocka Wocka!, Excuse Moi!, Designer... de Better! and Warm & Fozzie. Excuse Moi is one of the glitters.


Wocka Wocka! shown above. This colour is very opaque and it'll glide on in one coat (I did two as my first coat showed a streaky squiggle going down my nails :-)


Above we have Excuse Moi! This is one of the six glitters of the collection but unlike the others, this has a slightly opaque base - a pink similar to that of Teenage Dream but with maybe 500% intensity! The glitter and the pink is full on and I believe this can be achieved in two coats I might have tipped the ends with a third layer to get more consistent glitter coverage. This is a little pinker than the flash shot shows so I took one without:


Pretty! The polish has small rainbow and silver glitter - with no large silver chunks like the other 5 glitters.


Here we have Designer... de Better! It's a champagne foil with micro flecks of orange. In other lighting the specks can look a bit pink. I believe this was about three coats, it was a little sheer.


Finally we have Warm & Fozzie - a little micro glitter bomb of pink, orange and yellow gold that appears to have a slight duochrome effect. I went for this one first as it looked the most interesting of the lot but it took a few coats to get a good coverage - about 3-4.

That is it for the swatches! And inspired by the box of the minis I *attempted* some Kermit the Frog nail art:


Not quite happy with it - I can never find the right greens when I need them! This has been on my to do list for a while but at least I finally had a go! Well that's all I have for now. Hope you enjoyed the swatches and let me know what colours you are interested in or have bought! Have a fantastic weekend everyone and until next time...

Saturday, November 5, 2011

Tare panda nail art

Hey everyone! I thought I'd add some cuteness after the Halloween posts and do a San-x nail art. You might have heard of tare panda, if not here is some panda nail art :-D


Now here's the sad part. I took the photo above the day after I did these nails - after I realised I had my camera settings not quite right. I had the ISO pumped up (from when I was doing those glow in the dark shots in my last post) so the pictures below are horrible. I went from 0 to rage in about 2 seconds as soon as I saw these photos :-P Probably shouldn't do nail art at midnight when sleep deprived... Anyway, I hope you can still see what I was trying to do here!


So for the base I used MAC Ice Cream Cake, it's a lovely bright pink and I love painting my nails with this colour. Despite the crappy brush. I persist due to it's awesomeness.


Now for the thumb I went for the traditional lazy tare panda look where he's all flat and on the ground. I didn't have the space for the other nails so I decided to draw him standing up. He doesn't come out as 'tare panda' looking on the nails standing up like he does lying flat on the thumb nail, so I'm a little sad about that. But to start off with I figured out how I was going to paint them by drawing outlines on paper, which happened to also be a shopping list:


So with that top design in mind I started with an outline and filled:


Didn't fill the feet in totally as it was going to get filled in with black but I wanted an outline to 'colour in'. The white I used was OPI Alpine Snow.


Then I used a black polish to colour in the paws and ears (OPI I Only Date Werewolves).


Followed by the eyes and black around the neck.


Then instead of doing faint outlines of white for the eyes I dotted with white, and dotted smaller inside the white with black. I cleaned up the black a little and fixed some of the neck lines and voila! All done!


Weee my panda on the top of the panda pile! I have a few tare panda things, mostly letter sets and paper but I also have this plushie:


Cute! Well I hope you enjoyed the look and like tare panda as much as I do! I'm off to Brisbane *again* this weekend, so have an awesome weekend everyone and I'll see you next time!

Related Posts Plugin for WordPress, Blogger...